10 DAYS!!!! 10 DAYS!!!!
Sweet respite in August came in and out too quickly, like a brilliant sleight-of-hand, or a storm’s eye. We’re less than TWO WEEKS away, and each and every part of our coffee-inspired wedding is reaching their strenuous, pressure-cooker culmination! Imagine, hard planning for a full year, and still we can’t avoid being high-strung or being super-anxious/antsy about the lot of things – their final designs, final schedules, last-minute purchases, last-minute communications, instructions, payments and people, in general!!
Oh, please behave, world. Behave, and be calm.
But August had its share of personal triumphs and little glories that make us feel warm with pride, and, of course, with round-the-clock giddiness and excitement! First off, the staggered remodeling of our flat further subsided now that we’ve been trying to channel all our resources and time these last days towards the wedding. But even so, we haven’t been remiss in planning and discussing with our contractor the resumption (and, hopefully, completion) of renovation works in September. :-) It actually looks very promising now, even when in its fairly bare and still coat-less form. What’s nicer is that Kat’s Dad had volunteered to have our bed-frames done at his hometown in Quezon province – where wood is more abundant/cheaper, and the grain is more exotic. This is something we’ve both been very grateful of. Here in Q.C., I also found me some suppliers of mahogany, molave, and teak planks; and I just drool over the possibilities for using them as accents or what have you. Our MARVELOUS INVITES also came out in August – sealed and delivered – to great cheer and applause from our families, friends, officemates, extensions, and on-lookers alike. Suffice to say, the Invitations were absolutely GORGEOUS, and its melding of vintage and coffee imagery mesmerized and smoldered. :-) I was allowed to customize the text, so it didn’t read bland at all. It was of course more pleasing and delightful to see our ninongs, ninangs, and friends relay to us their very uplifting messages and affirmative descriptions of our extra-sized cards – possibly the largest one they’ve had or seen this year. And in all likelihood the most narcissistic, hehe! Our allies in PAPERFLAIR outdid themselves this time – and, for that, we thank you!!
Although most of our past weeks had been committed to delivering our invites to our guests scattered all over Manila / Mindanao / USA, we had our series of productive meetings with a few other vendors over the past 2-3 weeks of August to finally punctuate our pretty arrangements: with Rommell our florist/stylist, with a doting young couple from FrameUp, with Maui from Josiahs, and of course, our fittings/re-fittings with Jote of Sarto (mine) and Camille (Kat’s).
Of course, being able to juggle so many critical, final schedules this August has been a terrible test of patience, grace, and fortitude. And the stress builds up in a manner I don’t quite fully understand as much as the next guy; but, they have caught my partner Kat unaware more than a few times – who, on a whim, transforms into my whirlwind, tornado and earthquake. :-P
 |
| with Maui of Josiah's |
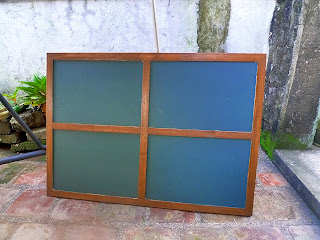
Another reason, though, for remembering this month is that I was finally able to pull off a pet project of mine I initially conceived back in May. It was really a simple, benign interest at the start – something which Kat at times dismissed as but unnecessary logistics! But over time – owing to my amateur fondness for wood works and wood grains, etc – not even my lackadaisical attitude towards petty things could underwhelm my resolve to complete this exclusive DIY project for the wedding. Kat calls it our Choc-Board, I call it our Martha Stewart Moment.
See how it went :-D
It started out this past summer, with a standard 3’x5’ plywood board I found sprawled at the back of our house.
I had one of the neighborhood carpenters first install a wooden frame roughly 1” wide across all sides.
Next. Bought a couple of soft paintbrushes, sandpaper in different grits, and clean cloth rags from Handyman Home Center.
I sanded the bastard initially with some coarse sandpaper (about 120 grit), then smoothed it out using paper with 280 grit. Gently run your fingers across the edges to check for rough patches, but be wary of splinters all the time. Wipe all the dust and imperfections with the rags as if your life depended on it. You’ll need the board well-sanded – more particularly if the wood had any pre-existing varnish or coating – for the stain and primer to work its magic.
Wood stains are tricky, since you can easily overpower the natural tint of your wood if you apply too much. I suggest sampling the stain on some extra piece of wood so you can come up with your desired color and coat. As much as I would’ve wanted to use Oak, I settled for American Walnut to give that sort of mahogany-esque bark to your grain.
If you’re using wood stain, be careful with excess spillage and inadvertent splashes that tend to mark other parts of your wood project (not to mention on your hands). So protect these other parts through whatever cover, tape or glove. You can use a brush or a rag to apply your stains in the fashion you want – i.e., a “haspy” look.
After having applied the wood stain, you can easily apply another coat within the next 30min-1hour depending on the intensity of the tint you had in mind. I only applied one coat, after witnessing that multiple coats on my dummy/sample tend to convey a much more robust burnt sienna. The oil-based stain also varies in impact based on the default grain or surface color of the wood.
 Next. Priming the board was a pretty straightforward exercise. I used a paintbrush instead of a roller in order to hit those difficult areas under/beneath the frame. Just remember to apply some masking or painter’s tape over the frame. If you mistakenly put some base coating on the frame, you’d need to sand these parts down again a bit and re-stain if the applied stain loses its evenness.
 I let the primed-wood dry over the week.
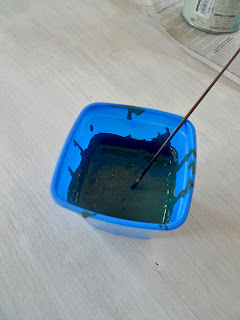
If the wood stain didn’t wake up the lumberjack in you, creating your very own Chalkboard paint might do one better. You’ll need a small pint of your preferred enamel paint, some tile grout (preferably, unsanded), paint brushes, a mixer, rags and a roller.
 While its more acceptable using flat latex paint on your board, I used a satin Carolina Pine Green coat for a slightly glossier finish. The color was something I had Ace Hardware create for me – only, I had them add an extra squirt of black paint to come up with a darker pine finish. Meanwhile, tips over the Internet are fairly unanimous as regards the ratio/proportion of the mixture: in my case, I used one (1) full cup of paint, and two (2) tbsps of grout. Unfortunately, no store or construction supply company in my area seemed to carry unsanded grout; so I settled for sanded grout leftover from our house’s recent renovation.
 I poured the mix into a small container, and stirred and stirred with tender love and affection. I noticed that even after vigorous mixing, the green paint was still “lumpy and soupy” like breakfast cereal that had already turned over. That’s just the sanded grout making its presence felt. I imagine the consistency of the paint would be even thicker, tangier, and harder to stir had I been using unsanded grout.
Applying the paint on the board was a bit more demanding than the prime coat. The grout/paint mix thickens quickly if left to dry or aerated. Hence, I had to be more efficient in using it on the wood surface. Without hesitation, I asked assistance from Jhe, our very proactive househelp, to work with me in parallel. She used a roller, whereas I stuck to my trusty paintbrush, as we dabbed the special coat in thorough, up-and-down brushstrokes (always paint along - not against - the orientation of the grain).
In less than 30 minutes, we were able to paint our neat mixture over the entire plywood board using one thick coat of the paint. However, I had to be extra vigilant in inspecting the painted wood surface for noticeable unevenness and residue from un-dissolved grout. Grout does that to your life!
About 72 hrs later, with the grout-paint fully dried up, I removed all the painter’s tape, and then proceeded to use very, very fine grit sandpaper on the painted board to remove annoying bumps and miniscule lumps that formed on the surface. I had to redo this several times actually, since its like peeling off skin and trying to avoid peeling anything more than that. Used a dry rag to delicately wipe away and minimize any cosmetic damage caused by the additional sanding.
Afterwards, I had the same carpenter add two additional 1” wood strips to “intersect” with the original one. I stained the same parts.
For the chalk or choc-board to happen, the last step is to prime our baby with chalk. Ever clairvoyant, Kat and I purchased last month a few chalk pieces from the bookstore, exactly with this end in mind. To prime the board, I rubbed the chalk’s lateral side all over the board’s surface. I was so surprised to see chalk dust fall off like snow as I did this – that I had to rest the plywood down on the floor.
After having rubbed chalk all over the messed-up board surface, I used a damp cloth to wipe everything clean – or, semi-clean, at the very least.
And Voila!! I now have a plus-sized, framed chalkboard. A cozy, home- and self-styled DIY additive perfect for interiors, coffee shops, and, yes, weddings! The best part is that this whole process can be replicated on other surfaces, furniture, and other objects.
Thanks to the worldwideweb (and Mrs. Stewart) for the tips and for convincing us to pursue our DIY outlets. :-) A truly great way of personalizing and investing in your own wedding celebration


Love it! Gawan mo din ako! ;)
ReplyDeleteSure sure!! :-D Got excess materials at home
ReplyDelete